I love being in my studio, whether its shooting a tutorial, using the workbench, or just attending a conference call. Since moving to NYC in 2003, I’ve always had to make do with a smaller-than-ideal workspace, except for those two years I lived in Arizona. Here’s a trip through workspaces of my past, starting with college.
I shared my freshman dorm with three other students. Four desks, four beds, four dressers, four NYC college freshmen women. I ended up doing a lot of my art school homework in the dorm’s study room or at the house where I babysat. But the furniture was the same at my next place:
The first space in NYC I had to myself was a single-off-a-suite I lucked into via the student housing lottery. The dorm was on Union Square West, just a few floors of the otherwise-privately-residential building above Blue Water Grill. (I’ve heard it has since been converted back to regular apartments and is no longer a New School dorm.) Since my bed was lofted, I could take over the whole floor with projects. Continue reading for the complete history of my workspaces:
I embroidered this portrait of my friends Randy and Jenn as a wedding gift!
An embroidered portrait of the happy couple is a perfect wedding gift! I made this one for my friends Randy and Jenn and would like to share the process with you (with their blessing).
An important part of this project is selecting the right type of stitch and line weight for different parts of the portrait. If you are an embroidery beginner, check out our free Instructables Embroidery Class, written by master stitcher Jessy Ratfink, to get you up to speed on the fundamentals.
We’re renters in NYC who needed some more storage space beyond what our kitchen cabinets and closets could provide. This guide details the construction of our storage cabinet solution, made entirely of 3/4″ plywood. The design has 12 shelves, one of which we left open, which can be used for a cat tower or fish tank.
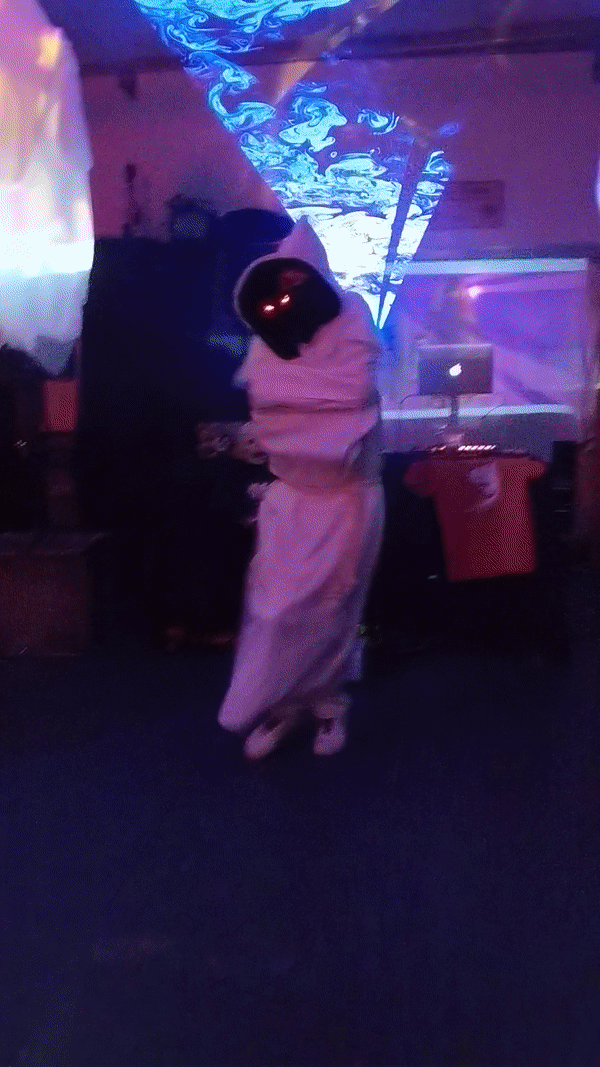
Twin Jawas! Double Orko! Two ghost wizards from Bubble-Bobble! This costume hood can be any LED-eyed creature you choose just by changing the colors. I first made this project in 2015 with a very simple circuit and code, but this year I wanted to create an upgraded version with simultaneous animation control across two costumes. This circuit uses one simple, close-range RF remote to control two receivers on the same frequency, and Arduino code employing interrupts to achieve responsive animation changes, based on Bill Earl’s tutorial code.
Thick fabric for hood/cape (for this version I used two layers of white tobacco cloth (1yd) and one layer of white cheesecloth (1yd), then lined the inside of the hood with solid black to block the light)
Organizing the clutter, finding stuff you forgot you had, throwing away junk, and cleaning your workbench can be fun and satisfying if you have a label maker. I recently overhauled my workbench storage for small parts and tools and want to share some of my process with you. Whether you’re into electronics, jewelry making, home improvement, or all three (+more) like me, hopefully, you’ll find something useful here.
I got my small parts drawers at Fry’s Electronics in Phoenix over a decade ago. I have the big red version and a smaller set too. They have mounting holes on the back so you can hang them from the wall. My small black ESD parts drawer set was from an old sampler of ESD cardboard products, but here’s a similar one.
When you go to organize your drawers, group them loosely based on the activity they are associated with. I have all my electronics parts up top and the lower drawers are for more household or crafty type projects. All the switches are together, all the IoT boards are in a row, the toothpicks are near the glue, etc. It’s not an exact science.
To make use of the small drawers, you really need a label maker!…
Label Maker
A label maker can really help your organization efforts pay off! What good is all that shuffling if you can’t remember where anything is? Hand-drawn labels aren’t ideal because they are hard to read from far away and hard to read if you weren’t the one who wrote them.
If you have access to a desktop printer, you can also print labels out on sticky paper or precut labels.
Consider adding special touches to drawers you use frequently, like a colored sticker or special symbol on the label. Part of my parts optimization is helping my partner find things too, and it’s easier to describe a drawer if it is unique-looking. “Where are the tiny screwdrivers?” “Low down in the middle, pink sticker!” Then I don’t have to interrupt what I’m doing to show him where something is.
Small Tools Storage
To make tools easy to reach when you need them, consider multiple locations for small tool storage.
A magnetic bar meant for kitchen knives hangs above my workbench, which has a wooden shelf storage system of its own. Nearby, a plastic tool caddy attaches to the front of my parts drawers. I also keep tools in the drawers of my jewelry workbench, and larger and less frequently used tools in a toolbox on a shelf nearby.
Since my workbench is actually a jeweler’s bench, I also have some small tool storage by way of a shelf/organizer add-on that has bars for pliers, a few drawers, and sectioned areas for different size tools and accessories (though it’s designed to hook onto the back lip of the desk).
Thanks for reading about my small workbench tool and parts storage!
If you like this project, you may be interested in some of my others:
Here’s how I created a leather wallet with solar-etched detailing. The simple four-piece design is one of my first leatherworking projects, and took a few afternoons to complete. I learned all the techniques for this project from the free Instructables Leatherworking classes (beginner & intermediate).
Create a fun light-up flower using 3D printing and Tinkercad! Optionally add some needle felting to diffuse the light from the LED at the center of the flower. The special Glow circuit assembly in Tinkercad makes it easy to put an LED and battery circuit into your 3D prints.
If you’d like to make the exact flower shown, you can download the attached STL files and get printing. You can modify the base model by clicking the “edit in 3D” button on the embedded Tinkercad model above (free Tinkercad account/login required). Or model your own unique flower in a new Tinkercad workplane using the tips in this tutorial.
You’ll need a 3D printer and filament to build this project. If you’re new to 3D printing, check out Jonathan Odom’s excellent free Instructables Easy 3D Printing Class to get you up to speed.
Let’s make glowing gummy candies that look like LEDs! The recipe for gummy candy is simple, the legs are 3D printed, and the special ingredient to make the candies glow under blacklight is vitamin B2 powder.
Here’s how I created custom vinyl stickers for my motorcycle helmet. I was inspired by hand painted helmet designs and chose brush script lettering to communicate my two most common thoughts about drivers while riding my motorcycle in NYC. For single-color designs like mine, you don’t need a big vinyl printer, just a hobby vinyl cutter will work fabulously. I was visiting the Pier 9 Autodesk workshop and used the Roland VersaCAMM printer/cutter because it was available. Alternatively, you could bring your sticker design files to a local sign printing shop for printing/cutting.