Cat Food Access Control with ESP8266

This project goes over the process I used to create an automated cat food bowl, for my elderly diabetic cat Chaz. See, he needs to eat breakfast before he can get his insulin, but I often forget to pick up his food dish before I go to bed, which spoils his appetite and throws off his insulin schedule. This dish uses a servo motor to close a lid over the food between the hours of midnight and 7:30am. The NodeMCU ESP8266 microcontroller’s Arduino sketch uses Network Time Protocol (NTP) to control the schedule.

This project may not be suitable for younger, more active cats. Chaz is so old and frail, he isn’t inclined to try to pry the bowl open, but it is possible.

Tutorial: https://www.instructables.com/id/Cat-Food-Access-Control-ESP8266-Servo-Motor-3D-Pri

If you’re new to the Arduino or the ESP8266, you may enjoy the following prerequisite guides:

Supplies:

To keep up with what I’m working on, follow me on YouTubeInstagramTwitterPinterest, and subscribe to my newsletter. As an Amazon Associate I earn from qualifying purchases you make using my affiliate links.

3D Printed Parts

The cat food bowl holder is based on Ardy Lai’s design on Thingiverse. I made it bigger to accommodate my cat’s bowl, and also made it shorter since scaling it up had made it too tall. I added a holder for a micro servo motor, and a couple of holes for cables to route to the inside.

File on Tinkercad: https://www.tinkercad.com/things/49HoW04XYVq-cat-food-access-control-bowl

I modeled a simple lid using Tinkercad, designed to attach to the horn of the micro servo. You can grab my design directly from Tinkercad, and/or download the STLs attached to this step.

I printed the parts on my Creality CR-10s Pro printer with gold PLA filament.

(more…)

Skeleton Sweatsuit (Free Pattern)

This year I stitched up some skeleton costumes using black sweatsuits and white stretch fabric. I stuffed up the bones to get a 3D effect.

This project will give you lots of practice using your sewing machine’s free arm. If you’re new to machine sewing, try Mikaela’s excellent, free Instructables Machine Sewing Class to bring you up to speed.

For this project, you will need:

To keep up with what I’m working on, follow me on YouTube, Instagram, Twitter, Pinterest, and subscribe to my newsletter. As an Amazon Associate I earn from qualifying purchases you make using my affiliate links.

Print and Assemble Pattern

Print the PDF pattern (formatted for US letter-sized paper). Align the tiled printout’s registration marks and use tape to secure. Cut out the pattern pieces with scissors.

(more…)

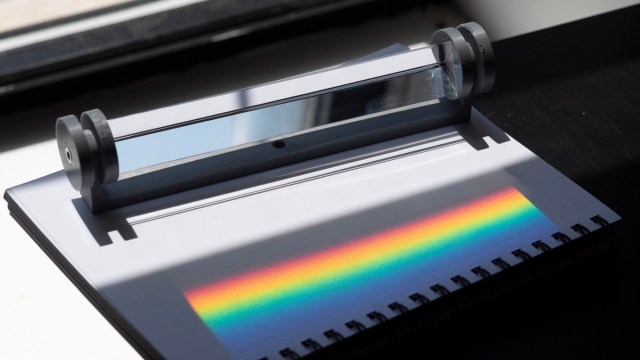
Prism Holder for Rainbow Portraits

I was inspired by the rainbow portrait trend to create a tool for precisely positioning a prism. This 3D printed prism holder cradles the glass while providing freedom to rotate for that perfect angle. The holder can be mounted on a c-stand or tripod, and comes together quickly with the attached STL files and a couple of nuts and bolts from the hardware store. Although I created it as a photography tool, it could also be used for physics demonstrations.

Here’s a project that has been on my list for TWO YEARS! Ugh, it’s so 2017… but I had fun modeling this prism holder in Tinkercad, 3D printing it, and using it to capture some rad selfies. It’s always fun to put another tool in the photography toolbox. 

Supplies

To keep up with what I’m working on, follow me on YouTube, Instagram, Twitter, Pinterest, and subscribe to my newsletter. As an Amazon Associate I earn from qualifying purchases you make using my affiliate links.

(more…)

Geometric Succulent Planter

I designed and 3D printed this geometric succulent planter in Tinkercad, which has five chambers with drainage and a catch tray.

Supplies

To keep up with what I’m working on, follow me on YouTube, Instagram, Twitter, Pinterest, and subscribe to my newsletter. As an Amazon Associate I earn from qualifying purchases you make using my affiliate links.

(more…)

Translate an Idea into Arduino Code

This tutorial walks through the process of combining Arduino sample sketches to make a working project prototype. Developing the code for your project can be the most intimidating part, especially if you haven’t done it a thousand times already.

If you’re a total Arduino newbie, try my free Arduino Class.

To keep up with what I’m working on, follow me on YouTube, Instagram, Twitter, Pinterest, and subscribe to my newsletter. As an Amazon Associate, I earn from qualifying purchases you make using my affiliate links.

Let’s dive in!

Define the Purpose

First, and this may seem obvious, but write out the main purpose of the project idea. If it has multiple functions, decide which features are needed versus those that would be nice but aren’t necessary at first. See also my previous tutorial about common Arduino mistakes including biting off more than you can chew. Keep it simple at first; you can always add to it later.

(more…)

Embroidered Portrait – Randy & Jenn

I embroidered this portrait of my friends Randy and Jenn as a wedding gift!

An embroidered portrait of the happy couple is a perfect wedding gift! I made this one for my friends Randy and Jenn and would like to share the process with you (with their blessing).

An important part of this project is selecting the right type of stitch and line weight for different parts of the portrait. If you are an embroidery beginner, check out our free Instructables Embroidery Class, written by master stitcher Jessy Ratfink, to get you up to speed on the fundamentals.

Supplies

To keep up with what I’m working on, follow me on YouTubeInstagramTwitterPinterest, and subscribe to my newsletter. As an Amazon Associate I earn from qualifying purchases you make using my affiliate links.

I was inspired to make this piece by seeing Brenna Allsuch’s beautiful embroidered portrait of a curly-haired couple. Check out her Etsy shop!

(more…)

Plywood Storage Wall

We’re renters in NYC who needed some more storage space beyond what our kitchen cabinets and closets could provide. This guide details the construction of our storage cabinet solution, made entirely of 3/4″ plywood. The design has 12 shelves, one of which we left open, which can be used for a cat tower or fish tank.

Materials:

  • Interior furniture-grade plywood (we used 7 sheets of 3/4″ Purebond maple)
  • Heavy-duty drywall anchors (we used snap toggles)
  • Pocket hole screws
  • Wood glue
  • Hinges
  • Door handles
  • Polycrylic or other protective finish
  • Primer & interior paint (optional)
  • Roller/brush for applying finish
  • Old carpet scraps (for optional cat feature)

Tools:

To keep up with what I’m working on, follow me on YouTube, Instagram, Twitter, Pinterest, and subscribe to my newsletter. As an Amazon Associate I earn from qualifying purchases you make using my affiliate links.

(more…)

Easy Motorcycle Ramp

It’s simple to create your own ramp for moving motorcycles in and out of vehicles with a few pieces of lumber and special ramp bracket. The hinged design makes a compact, sturdy, portable ramp that folds out to 16 inches wide. We use ours to transport our bikes to and from our winter storage facility and also when they break down.

To keep up with what I’m working on, follow me on YouTube, Instagram, Twitter, Pinterest, and subscribe to my newsletter.

Materials & Tools

For this project, you will need:

As an Amazon Associate I earn from qualifying purchases you make using my affiliate links.

(more…)

Glowing Eyes Costume

Twin Jawas! Double Orko! Two ghost wizards from Bubble-Bobble! This costume hood can be any LED-eyed creature you choose just by changing the colors. I first made this project in 2015 with a very simple circuit and code, but this year I wanted to create an upgraded version with simultaneous animation control across two costumes. This circuit uses one simple, close-range RF remote to control two receivers on the same frequency, and Arduino code employing interrupts to achieve responsive animation changes, based on Bill Earl’s tutorial code.

For this project, you will need:

To keep up with what I’m working on, follow me on YouTube, Instagram, Twitter, Pinterest, and subscribe to my newsletter. As an Amazon Associate I earn from qualifying purchases you make using my affiliate links.

(more…)

Scooter Underglow

Join me in creating ground effect lighting for my scooter using a bluetooth microcontroller and addressable LED strip.

For this project I’m recycling two bits of pixel strip leftover from my old POV bike project tutorial. These are APA102s or DotStars, but you could totally use Neopixels for this project, I just happened to have this set of two strips wired in parallel, which is perfect for sticking under my scooter.

For this project you will need:

To keep up with what I’m working on, follow me on YouTubeInstagramTwitterPinterest, and subscribe to my newsletter. As an Amazon Associate I earn from qualifying purchases you make using my affiliate links.

Legal disclaimer! The automotive underglow lighting laws where you live may prohibit some or all colors/animations– where I live, only solid white is technically allowed, and I don’t drive with any other colors/patterns in traffic. Never use flashing lights in the colors emergency vehicles use!

(more…)